Run a Private Stoat Chat Server on Your Own Domain
Use scripts to secure a fresh DigitalOcean Droplet, install Stoat's official Docker Compose stack, then prove the web client works before inviting anyone.
Companion GitHub repositoryCompanion Stoat Droplet runbookTylorMayfield/stoat-droplet-runbookView on GitHubCreate the Droplet and firewall
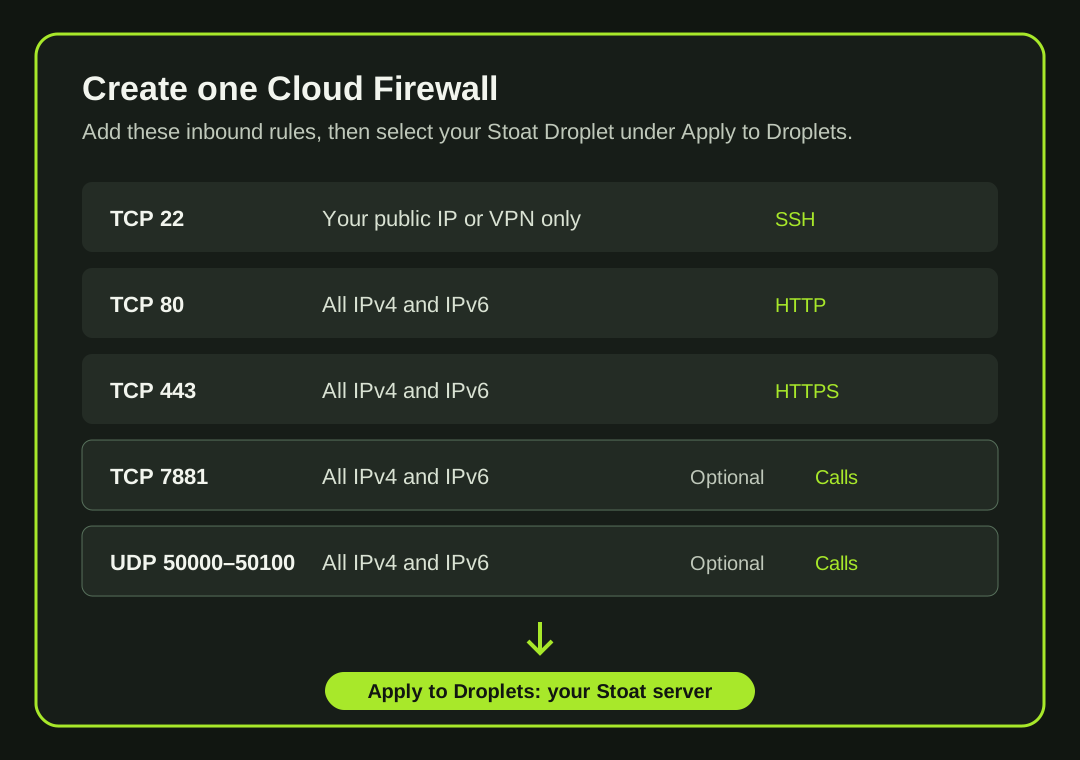
Create a fresh Ubuntu Droplet with at least 2 vCPUs and 2 GB RAM. Add an SSH key during creation. Then create a Cloud Firewall, attach it to this Droplet, and point a hostname such as chat.example.com at its public IPv4 address. This is a Docker Compose deployment, not an App Platform app or one-container demo.
- TCP 22 from your own public IP or VPN only.
- TCP 80 and 443 from everywhere for the web client and HTTPS certificates.
- TCP 7881 and UDP 50000 through 50100 from everywhere only if you want LiveKit calls.
- Leave MongoDB, Valkey, RabbitMQ, MinIO, and Docker without public host ports.
Attach the firewall before you connect
In the Cloud Firewall form, create the inbound rules below and choose this server under Apply to Droplets. Keep DigitalOcean's default outbound allow-all rules. The two call rules are optional. Do not add them if your community will not use calls.
Check the first response
- Expected result
- The public hostname returns HTTPS, Compose reports the expected services, and a separate browser can complete a harmless web-client test without exposing a backing service.
- Stop if
- Stop if SSH is open to the internet, a data service has a host port, DNS does not point to the Droplet, a certificate fails, a secret appears in output, or a LiveKit port is open without a deliberate call-testing plan.
- Next step
- Back up configuration and persistent data, test a restore away from production, then record the repository commit and image versions before inviting users.
Connect, harden, then install
Use the Droplet's public IPv4 address from the DigitalOcean dashboard. The hardening script updates Ubuntu and turns off SSH password login only when it finds a root SSH key. Keep this terminal open, then confirm a second SSH login works. The preflight script changes nothing. The install script requires --apply, refuses to overwrite /opt/stoat, and opens Stoat's configuration generator.
Before continuing: This updates Ubuntu and disables SSH password login after confirming a root SSH key exists. Keep the first SSH session open and test a second login.
- Edit firstReplace every highlighted value before running this command.
ssh root@YOUR_DROPLET_IPReplace before running:
YOUR_DROPLET_IP git clone https://github.com/TylorMayfield/stoat-droplet-runbook.gitcd stoat-droplet-runbooksudo ./scripts/harden-host.sh --apply
Before continuing: This installs Docker and writes Stoat secrets on a new server. Confirm the Cloud Firewall and DNS before you run the final install step.
cd ~/stoat-droplet-runbook- Edit firstReplace every highlighted value before running this command.
sudo ./scripts/preflight.sh chat.example.comReplace before running:
chat.example.com - Edit firstReplace every highlighted value before running this command.
sudo ./scripts/install-official-stoat.sh --apply chat.example.comReplace before running:
chat.example.com
Start once, then check HTTPS
The configuration generator creates secrets.env. Back it up before you start the service. Start in the foreground, read errors if any appear, then stop with Ctrl+C and run the detached command. The verification script checks the Compose configuration, running services, and public HTTPS without printing secrets. It does not prove the web app works yet.
Before continuing: The foreground command starts the full Stoat service stack. Read its output before you stop it and start the detached service.
cd /opt/stoatsudo docker compose upsudo docker compose up -d- Edit firstReplace every highlighted value before running this command.
sudo ~/stoat-droplet-runbook/scripts/verify-stoat.sh chat.example.comReplace before running:
chat.example.com
Do one small real test
Open https://chat.example.com in a separate browser profile. Create a test account, send one harmless message, and upload a disposable file if you enabled file storage. If you enabled calls, test from a second network. A green HTTPS page does not prove the call ports work.
Use the browser client or install it as a PWA. Most official Stoat clients do not support self-hosted instances. Stop if a backing service is public, the certificate fails, secrets appear in output, or you cannot explain why a port is open. Read Stoat's official notices before every update.